Difference between revisions of "The Mage's Inquisition Quest (GoC)"
(→Labyrinth) |
(→Palace of Paroxysmus) |
||
| (133 intermediate revisions by 2 users not shown) | |||
| Line 2: | Line 2: | ||
| − | The Mage's Inquisition Quest (GoC) is a great adventure with useful [[ | + | The Mage's Inquisition Quest (GoC) is a great adventure with useful [[The Mage's Inquisition Quest (GoC)#The Joys of Completion |rewards.]] The rewards are so great that the quest itself must be completed with a lot of work, time, and in some instances, in groups. |
This quest is split into 6 chapters, consisting of dungeons with creatures of various difficulties that yield key items needed for completion. | This quest is split into 6 chapters, consisting of dungeons with creatures of various difficulties that yield key items needed for completion. | ||
| + | = The Collection Awaits = | ||
| − | + | This guide has been separated into sections for an easier understanding of each individual area. Each section contains: | |
| + | *Relevant monsters/the quest items they drop. | ||
| + | *Notable monsters that are not relevant to the quest but worth keeping an eye out for (either dangerous or may contain good loot). | ||
| + | *The "Boss" of the area and their respawn time/how to summon them. | ||
| − | + | Each section also includes the location of the area on the world map (at the top) and the old walkthrough (at the bottom). Clicking on a Monster will bring you to their information page, which includes Stats (HP/Resists/Abilities/etc.) and suggested Tactics to use to defeat them. | |
| − | + | == Blighted Grove == | |
| − | + | Blighted Grove, near the dungeon Shame in Felucca, is considered the easiest of all the dungeons in the quest. It is the best place to start. | |
| − | [[ | + | [[Blighted Grove Location | Blighted Grove Location]] |
| − | |||
| − | [[ | + | {| border="5" cellpadding="6" cellspacing="2" style="background:#FFFFFF;" |
| + | |+ <u>Blighted Grove Quest</u> | ||
| + | ! Monster | ||
| + | ! Quest Item | ||
| + | |- | ||
| + | | [[Thrasher]] | ||
| + | | [[Thrasher's Scale]][[File:ThrashersScale.png|link=Thrasher's Scale]] | ||
| + | |- | ||
| + | | [[Abscess]] | ||
| + | | [[Abscess Tooth]][[File:Abscesstooth.png|link=Abscess Tooth]] | ||
| + | |- | ||
| + | | [[Drevo]] | ||
| + | | [[Remnants Of An Ancient Ent]][[File:Remnants Of An Ancient Ent.png|link=Remnants Of An Ancient Ent]] | ||
| + | |- | ||
| + | | [[Tangle]] | ||
| + | | [[Tangle Fluid]][[File:Tangle Fluid.png|link=Tangle Fluid]] | ||
| + | |- | ||
| + | | [[Insane Dryad]] | ||
| + | | [[Insanity Taffy]][[File:Insanity Taffy.png|link=Insanity Taffy]] | ||
| + | |- | ||
| + | | [[Saliva]] | ||
| + | | [[Dream Catcher]][[File:Dream Catcher.png|link=Dream Catcher]] | ||
| + | |- | ||
| + | | [[Lady Melisande]] | ||
| + | | [[Lady Melisande's Spellbook]][[File:Lady Melisandes Spellbook.png|link=Lady Melisande's Spellbook]] | ||
| + | |} | ||
| − | |||
| − | + | <u>Boss</u>: [[Peerless Monsters#Lady Melisande|'''Lady Melisande''']] | |
| + | *In order to do battle with Lady Mel, you must first complete the''' [[Lady Melisande Quest]]'''. For more information, see the [[Peerless Monsters#Lady Melisande|Peerless Page]]. | ||
| − | |||
| − | Blighted Grove | + | [[Blighted Grove Gem Quest | Blighted Grove Walkthrough (Old)]] |
| − | + | ==Sanctuary== | |
| − | + | Sanctuary, located on the eastern side of the mountain that homes the dungeon Shame in Felucca, will be the second dungeon you will want to tackle in this adventure. The dungeon is filled with secret teleports to move around to different areas. | |
| − | + | [[Sanctuary Location | Sanctuary Location]] | |
| − | |||
| − | [[ | + | {| border="5" cellpadding="6" cellspacing="2" style="background:#FFFFFF;" |
| + | |+ <u>Sanctuary Quest</u> | ||
| + | ! Monster | ||
| + | ! Quest Item | ||
| + | |- | ||
| + | | [[The Cyclopian Warrior]] | ||
| + | | [[Cyclopian Axe]][[File:Cyclopian Axe.png|link=Cyclopian Axe]] | ||
| + | |- | ||
| + | | [[Katchaki]] | ||
| + | | [[Spanish Doubloon]][[File:Spanish Doubloon.png|link=Spanish Doubloon]] | ||
| + | |- | ||
| + | | [[Skrat the Imp Lord]] | ||
| + | | [[Magic Stones]][[File:Magic Stones.png|link=Magic Stones]] | ||
| + | |- | ||
| + | | [[Fire Ruby Dragon]] | ||
| + | | [[Smoldering Larynx]][[File:Smoldering Larynx.png|link=Smoldering Larynx]] | ||
| + | |- | ||
| + | | [[Netopir]] | ||
| + | | [[Dead Mouse]][[File:Dead Mouse.png|link=Dead Mouse]] | ||
| + | |} | ||
| − | |||
| − | + | <u>Boss</u>: [[Peerless Monsters#Netopir|'''Netopir''']] | |
| + | *Netopir does not need to be summoned and has a two hour respawn time. For more information, see the [[Peerless Monsters#Netopir|Peerless Page]]. | ||
| − | |||
| − | + | [[Sanctuary Gem Quest | Sanctuary Walkthrough (Old)]] | |
| − | + | ==Labyrinth== | |
| − | + | Labyrinth, accessed via the Grimswind Ruins in Malas, is a long maze dungeon that contains hidden teleporters that move you to various areas in the dungeon... Even backwards. | |
| − | + | [[Labyrinth Location | Labyrinth Location]] | |
| − | |||
| − | + | {| border="5" cellpadding="6" cellspacing="2" style="background:#FFFFFF;" | |
| + | |+ <u>Labyrinth Quest</u> | ||
| + | ! Monster | ||
| + | ! Quest Item | ||
| + | |- | ||
| + | | [[ Golden Liscar]] | ||
| + | | [[ Gold Nugget]] [[File:Gold Nugget.png|link=Gold Nugget]] | ||
| + | |- | ||
| + | | [[ Skorp Warrior]] | ||
| + | | [[ Skorp Stinger]] [[File:Skorp Stinger.png|link=Skorp Stinger]] | ||
| + | |- | ||
| + | | [[ Egiptski Dragon]] | ||
| + | | [[ Egiptski Relic]] [[File:Egiptski Relic.png|link=Egiptski Relic]] | ||
| + | |- | ||
| + | | [[ Pyre]] | ||
| + | | [[ Pyre Feathers]] [[File:Pyre Feathers.png|link=Pyre Feathers]] | ||
| + | |- | ||
| + | | [[ Slaarion]] | ||
| + | | [[ Horn of Defeat]] [[File:Horn of Defeat.png|link=Horn of Defeat]] | ||
| + | |} | ||
| − | |||
| − | + | <u>'''Notable Monsters'''</u> | |
| − | + | [[Minotaurs]] - There are three type. Captains, Scouts, and Regular. While all three can easily kill someone unprepared, the Scouts are by and far the most dangerous and will routinely one/two shot someone with 400+ HP. Sometimes Minotaurs will not drop any gold. | |
| − | + | [[Rends]] - Angry little buggers that don't forget aggro. They hit hard, they're harder to kill, and not worth it to boot. They won't attack you, so just don't hit them by accident. | |
| − | |||
| − | + | <u>Boss</u>: [[Peerless Monsters#Slaarion|'''Slaarion''']] | |
| + | * Slaarion does not need to be summoned and has a fifteen minute respawn time. For more information, see the [[Peerless Monsters#Slaarion|Peerless Page]]. | ||
| − | |||
| − | + | [[Labyrinth Gem Quest | Labyrinth Walkthrough (Old)]] | |
| − | + | ==Palace of Paroxysmus== | |
| − | + | The Palace of Paroxysmus, northeast of Terathan Keep in Felucca, is a long dungeon with a poison river running through it. | |
| − | + | [[Palace of Paroxysmus Location | Palace of Paroxysmus Location]] | |
| − | |||
| − | ==== [[ | + | {| border="5" cellpadding="6" cellspacing="2" style="background:#FFFFFF;" |
| + | |+ <u>Palace of Paroxysmus Quest</u> | ||
| + | ! Monster | ||
| + | ! Quest Item | ||
| + | |- | ||
| + | | [[Toxic Experiment]] | ||
| + | | [[ Radioactive Material]] [[File:Radioactive Material.png|link=Radioactive Material]] | ||
| + | |- | ||
| + | | [[Otrov the Widowmaker]] | ||
| + | | [[ Deadly Fang]] [[File:Deadly Fang.png|link=Deadly Fang]] | ||
| + | |- | ||
| + | | [[Putrid Waste]] | ||
| + | | [[ Smelly Goo]] [[File:Smelly Goo.png|link=Smelly Goo]] | ||
| + | |- | ||
| + | | [[Izdajalska]] | ||
| + | | [[ Vile Venom]] [[File:Vile Venom.png|link=Vile Venom]] | ||
| + | |- | ||
| + | | [[Chief Paroxysmus]] | ||
| + | | [[ Acid Proof Rope]] [[File:Acidproof Rope.png|link=Acid Proof Rope]] | ||
| + | |} | ||
| − | |||
| − | + | <u>Boss</u>: [[Chief Paroxysmus]] | |
| + | *In order to do battle with Chief Paroxysmus you must first gather [[Feeding The Beast | 8 summoning items]]. For more information, see the [[Peerless Monsters#Chief Paroxysmus|Peerless Page]]. | ||
| − | |||
| − | + | [[Palace of Paroxysmus Gem Quest | Palace of Paroxysmus Walkthrough (Old)]] | |
| − | + | ==Bedlam== | |
| − | |||
| − | + | Bedlam is a smaller dungeon accessed from Umbra, Malas, with areas holding the possibility of certain death. | |
| − | + | [[Bedlam Location | Bedlam Location]] | |
| − | |||
| − | + | {| border="5" cellpadding="6" cellspacing="2" style="background:#FFFFFF;" | |
| + | |+ <u>Bedlam Quest</u> | ||
| + | ! Monster | ||
| + | ! Quest Item | ||
| + | |- | ||
| + | | [[Red Death]] | ||
| + | | [[ Adam's Rib]] [[File:Adams Rib.png|link=Adam's Rib]] | ||
| + | |- | ||
| + | | [[Skeletor]] | ||
| + | | [[ Skeleton Key]] [[File:Skeleton Key.png|link=Skeleton Key]] | ||
| + | |- | ||
| + | | [[Master Jonath]] | ||
| + | | [[ Jonath's Mask]] [[File:Jonath's Mask.png|link=Jonath's Mask]] | ||
| + | |- | ||
| + | | [[Lord Malachai]] | ||
| + | | [[ Jade Amulet]] [[File:Jade Amulet.png|link=Jade Amulet]] | ||
| + | |- | ||
| + | | [[Monstrous Interred Grizzle]] | ||
| + | | [[ Grizzled Bones]] [[File:Grizzled Bones.png|link=Grizzled Bones]] | ||
| + | |} | ||
| − | |||
| − | + | {| border="1" cellpadding="2" cellspacing="1" style="background:#FFFFFF;" | |
| + | |+ <u>Bedlam Mini Quest Monsters</u> | ||
| + | ! Monster | ||
| + | ! Item | ||
| + | ! Use | ||
| + | |- | ||
| + | | [[Ancient Mage Mikael]] | ||
| + | | [[ Crypt Key]] [[File:Crypt Key.png|link=Crypt Key]] | ||
| + | | Bedlam Crypt Entrance | ||
| + | |- | ||
| + | | [[Master Theophilus]] | ||
| + | | [[ Book of Secrets]] [[File:Book of Secrets.png|link=Book of Secrets]] | ||
| + | | Bedlam Library Password | ||
| + | |} | ||
| − | |||
| − | + | <u>'''Notable Monsters'''</u> | |
| − | + | [[Flesh Eating Dragon]] - A Dragon interred amongst a pit of bones within Bedlam. A fearsome foe that will one-shot even the most hearty of warriors. Best avoided, as no quest treasures stand to be gained from this beast. | |
| + | |||
| + | [[Vrokan Guardians]] - The guardians to the entrance of Bedlam. Fight or flee, as these have no items relevant to your reason to venture to Bedlam, aside from gold. | ||
| − | |||
| − | + | <u>Boss</u>: [[Peerless Monsters#Monstrous Interred Grizzle|'''Monstrous Interred Grizzle''']] | |
| + | * Monstrous Interred Grizzle does not need to be summoned and has a thirty minute respawn time. For more information, see the [[Peerless Monsters#Monstrous Interred Grizzle|Peerless Page]]. | ||
| − | |||
| − | [[ | + | [[Bedlam Gem Quest | Bedlam Walkthrough (Old)]] |
| − | == | + | ==Prism of Light== |
| − | + | The Prism of Light is located in Felucca on the isle of Nujel'm . It is a circular one way dungeon with teleporters to be used to gain further access in the dungeon. | |
| − | + | [[Prism of Light Location | Prism of Light Location]] | |
| − | == | + | {| border="5" cellpadding="6" cellspacing="2" style="background:#FFFFFF;" |
| + | |+ <u>Prism of Light Quest</u> | ||
| + | ! Monster | ||
| + | ! Quest Item | ||
| + | |- | ||
| + | | [[ Glacial Water Elemental]] | ||
| + | | [[ Jar of Glacial Water]] [[File:Jar of Glacial Water2.png|link=Jar of Glacial Water]] | ||
| + | |- | ||
| + | | [[ Ice Vortex]] | ||
| + | | [[ Frozen Soul]] [[File:Frozen Soul2.png|link=Frozen Soul]] | ||
| + | |- | ||
| + | | [[ Crystal Hydra]] | ||
| + | | [[ Hydra Scale]] [[File:Hydra Scale2.png|link= Hydra Scale]] | ||
| + | |- | ||
| + | | [[ Crystal Giant]] | ||
| + | | [[ Kristalen]] [[File:Kristalen2.png|link= Kristlen]] | ||
| + | |- | ||
| + | | [[ Ice Wyrmling]] | ||
| + | | [[ Ring of Ice]] [[File:Ring of Ice2.png|link= Ring of Ice]] | ||
| + | |- | ||
| + | | [[Frozen Mummy]] | ||
| + | | [[ Icy Heart]] [[File:Icy Heart2.png|link = Icy Heart]] | ||
| + | |- | ||
| + | | [[Ice Wyrm]] | ||
| + | | [[ Ice Wyrm Spike]] [[File:Ice Wyrm Spike2.png|link=Ice Wyrm Spike]] | ||
| + | |- | ||
| + | | [[Shimmering Effusion]] | ||
| + | | [[ Prism of Light]] [[File:Prism of Light2.png|link= Prism of Light]] | ||
| + | |} | ||
| − | |||
| − | + | <u>Boss</u>: [[Peerless Monsters#Shimmering Effusion|'''Shimmering Effusion''']] | |
| + | *In order to do battle with the Shimmering Effusion you must [[Peerless Monsters#Shimmering Effusion | collect five crystals]]. | ||
| + | [[Shimmering Effusion Quest | (An expanded page on the Effusion Quest is in the works. Please refer to the link before this in the meantime.)]] | ||
| − | |||
| + | [[Prism Of Light Gem Quest | Prism of Light Walkthrough (Old)]] | ||
| + | = The Collection Offered = | ||
| + | Once you have gathered the required items, you will need to offer each dungeon's items up separately. To do this you must gather "Collector Boxes" for the area in which you wish to obtain the gem from. | ||
| + | Head to the Excelsior Halls which is on the World Telepad in the "Custom" Section. Walk east and into the building to the North. | ||
| + | Find Aerial the Collector Maker. [http://www.uoex.net/wiki/File:Aerial_the_Collector_Maker.png Map View] | ||
| − | + | Here you must speak the name of the dungeon you wish to get the collector box for. (This must be the dungeon's full name) | |
| − | [http://www.uoex.net/ | + | Once you have the pieces ready and your collector box in your backpack, it is now time for you to add the items from the dungeon into the collector box. |
| − | [http://www.uoex.net/ | + | |
| − | [[ | + | Upon adding the final piece from the specific dungeon, you will be '''instantly''' transported to the designated area for each individual dungeon. Walk North to the npc and he will take your collector box and give you a gem from the area you completed. |
| + | |||
| + | You must now wait 72 hours before you can fill another dungeon's collector box. | ||
| + | |||
| + | <b><span style="color:red">Warning:</span> The item collector must be in your pack when entering this special room. If you add the final item to the collector while it is on the ground, in your bank box, or somewhere else, you will be transported but unable to trade for the Gem. All items in the collector are destroyed once the last one is placed, and you will have to start over on this dungeon.</b> | ||
| + | |||
| + | = Six Gems for a Seventh = | ||
| + | |||
| + | Once you have claimed the gems for all 6 dungeons, it is time to use your 7th collector, the Gem Collector. To get the Gem Collector you must revisit Aerial the Collector Maker and say "Gem Collector" Place the 6 gems within, and you will trade one final time for [http://www.uoex.net/wiki/File:GoC.png The Gem of Completion]. Congratulations you have completed the Mage's Inquisition Quest. | ||
| + | |||
| + | = The Joys of Completion = | ||
| + | |||
| + | [[File:GoC.png]]''' Gem Of Completion'''[[File:GoC.png]] | ||
| + | |||
| + | The Gem of Completion is a blue/orange bracelet; when double-clicked, allows you to pick one of the GoC items. | ||
| + | |||
| + | |||
| + | [[File:GoCMenu.png]] | ||
| + | |||
| + | = Rewards = | ||
| + | |||
| + | |||
| + | {| border="5" cellpadding="6" cellspacing="2" style="background:#A6A6A6; | ||
| + | ! Name | ||
| + | ! Appearance | ||
| + | ! Preview | ||
| + | |- | ||
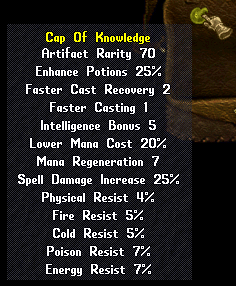
| + | | ''' Cap of Knowledge (Cap):''' | ||
| + | | align="center"| [[File:Cap of Knowledge.png|link=http://www.uoex.net/w/images/9/91/Cap.png|Click to see stats]] | ||
| + | | [http://www.uoex.net/w/images/9/91/Cap.png View Item Stats] | ||
| + | |- | ||
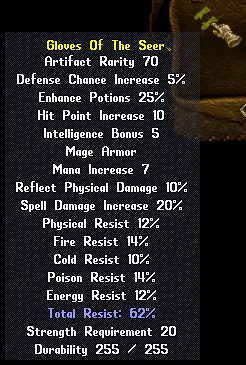
| + | | '''Gloves of the Seer (Gloves):''' | ||
| + | | align="center"|[[File:Gloves of the Seer.png|link=http://www.uoex.net/w/images/3/37/Gloves.png|Click to see stats]] | ||
| + | | [http://www.uoex.net/w/images/3/37/Gloves.png View Item Stats] | ||
| + | |- | ||
| + | | '''Shaman's Sleeves (Sleeves):''' | ||
| + | | align="center"|[[File:Shaman's Sleeves.png|link=http://www.uoex.net/w/images/a/a9/Sleeves.png|Click to see stats]] | ||
| + | | [http://www.uoex.net/w/images/a/a9/Sleeves.png View Item Stats] | ||
| + | |- | ||
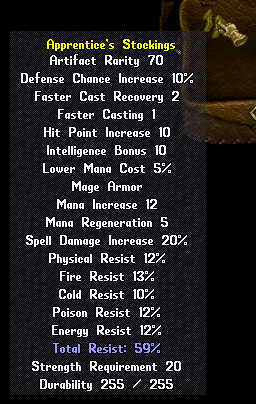
| + | | '''Apprentice's Stockings (Boots):''' | ||
| + | | align="center"|[[File:Apprentice's Stockings.png|link=http://www.uoex.net/w/images/6/6f/Stockings.png|Click to see stats]] | ||
| + | | [http://www.uoex.net/w/images/6/6f/Stockings.png View Item Stats] | ||
| + | |- | ||
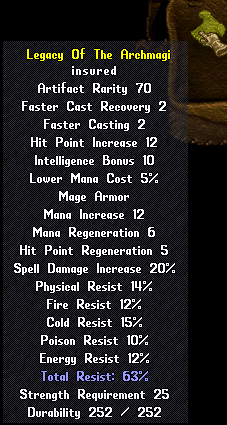
| + | | '''Legacy of the Archmagi (Male Chest): ''' | ||
| + | | align="center"|[[File:Legacy of the Archmagi Male.png|link=http://www.uoex.net/w/images/6/60/MaleLegacy.png|Click to see stats]] | ||
| + | | [http://www.uoex.net/w/images/6/60/MaleLegacy.png View Item Stats] | ||
| + | |- | ||
| + | | '''Legacy of the Archmagi (Female Chest): ''' | ||
| + | | align="center"|[[File:Vile Venom.png|link=http://www.uoex.net/w/images/d/d1/Legacy.png|Please PM Devlin in game if you have one of these so I can get a proper image... This is what was available lol.]] | ||
| + | | [http://www.uoex.net/w/images/d/d1/Legacy.png View Item Stats] | ||
| + | |- | ||
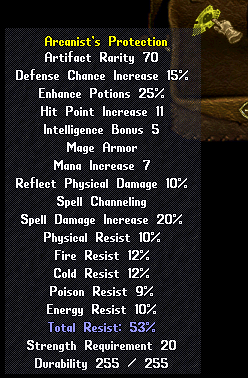
| + | | '''Arcanist's Protection (Shield):''' | ||
| + | | align="center"|[[File:Arcanist's Protection.png|link=http://www.uoex.net/w/images/0/07/Arcanists.png|Click to see stats]] | ||
| + | | [http://www.uoex.net/w/images/0/07/Arcanists.png View Item Stats] | ||
| + | |} | ||
| + | |||
| + | |||
| + | [[The Mage%27s Inquisition Quest (GoC)#Top | Back to Top]] | ||
Latest revision as of 00:20, 26 September 2018
Edit: This page is being updated and combined with other pages. Please have patience as this process to re-write and update is not always fast.
The Mage's Inquisition Quest (GoC) is a great adventure with useful rewards. The rewards are so great that the quest itself must be completed with a lot of work, time, and in some instances, in groups.
This quest is split into 6 chapters, consisting of dungeons with creatures of various difficulties that yield key items needed for completion.
Contents
The Collection Awaits
This guide has been separated into sections for an easier understanding of each individual area. Each section contains:
- Relevant monsters/the quest items they drop.
- Notable monsters that are not relevant to the quest but worth keeping an eye out for (either dangerous or may contain good loot).
- The "Boss" of the area and their respawn time/how to summon them.
Each section also includes the location of the area on the world map (at the top) and the old walkthrough (at the bottom). Clicking on a Monster will bring you to their information page, which includes Stats (HP/Resists/Abilities/etc.) and suggested Tactics to use to defeat them.
Blighted Grove
Blighted Grove, near the dungeon Shame in Felucca, is considered the easiest of all the dungeons in the quest. It is the best place to start.
| Monster | Quest Item |
|---|---|
| Thrasher | Thrasher's Scale |
| Abscess | Abscess Tooth |
| Drevo | Remnants Of An Ancient Ent |
| Tangle | Tangle Fluid |
| Insane Dryad | Insanity Taffy |
| Saliva | Dream Catcher |
| Lady Melisande | Lady Melisande's Spellbook |
Boss: Lady Melisande
- In order to do battle with Lady Mel, you must first complete the Lady Melisande Quest. For more information, see the Peerless Page.
Blighted Grove Walkthrough (Old)
Sanctuary
Sanctuary, located on the eastern side of the mountain that homes the dungeon Shame in Felucca, will be the second dungeon you will want to tackle in this adventure. The dungeon is filled with secret teleports to move around to different areas.
| Monster | Quest Item |
|---|---|
| The Cyclopian Warrior | Cyclopian Axe |
| Katchaki | Spanish Doubloon |
| Skrat the Imp Lord | Magic Stones |
| Fire Ruby Dragon | Smoldering Larynx |
| Netopir | Dead Mouse |
Boss: Netopir
- Netopir does not need to be summoned and has a two hour respawn time. For more information, see the Peerless Page.
Labyrinth
Labyrinth, accessed via the Grimswind Ruins in Malas, is a long maze dungeon that contains hidden teleporters that move you to various areas in the dungeon... Even backwards.
| Monster | Quest Item |
|---|---|
| Golden Liscar | Gold Nugget |
| Skorp Warrior | Skorp Stinger |
| Egiptski Dragon | Egiptski Relic |
| Pyre | Pyre Feathers |
| Slaarion | Horn of Defeat |
Notable Monsters
Minotaurs - There are three type. Captains, Scouts, and Regular. While all three can easily kill someone unprepared, the Scouts are by and far the most dangerous and will routinely one/two shot someone with 400+ HP. Sometimes Minotaurs will not drop any gold.
Rends - Angry little buggers that don't forget aggro. They hit hard, they're harder to kill, and not worth it to boot. They won't attack you, so just don't hit them by accident.
Boss: Slaarion
- Slaarion does not need to be summoned and has a fifteen minute respawn time. For more information, see the Peerless Page.
Palace of Paroxysmus
The Palace of Paroxysmus, northeast of Terathan Keep in Felucca, is a long dungeon with a poison river running through it.
| Monster | Quest Item |
|---|---|
| Toxic Experiment | Radioactive Material |
| Otrov the Widowmaker | Deadly Fang |
| Putrid Waste | Smelly Goo |
| Izdajalska | Vile Venom |
| Chief Paroxysmus | Acid Proof Rope |
Boss: Chief Paroxysmus
- In order to do battle with Chief Paroxysmus you must first gather 8 summoning items. For more information, see the Peerless Page.
Palace of Paroxysmus Walkthrough (Old)
Bedlam
Bedlam is a smaller dungeon accessed from Umbra, Malas, with areas holding the possibility of certain death.
| Monster | Quest Item |
|---|---|
| Red Death | Adam's Rib |
| Skeletor | Skeleton Key |
| Master Jonath | Jonath's Mask |
| Lord Malachai | Jade Amulet |
| Monstrous Interred Grizzle | Grizzled Bones |
| Monster | Item | Use |
|---|---|---|
| Ancient Mage Mikael | Crypt Key |
Bedlam Crypt Entrance |
| Master Theophilus | Book of Secrets |
Bedlam Library Password |
Notable Monsters
Flesh Eating Dragon - A Dragon interred amongst a pit of bones within Bedlam. A fearsome foe that will one-shot even the most hearty of warriors. Best avoided, as no quest treasures stand to be gained from this beast.
Vrokan Guardians - The guardians to the entrance of Bedlam. Fight or flee, as these have no items relevant to your reason to venture to Bedlam, aside from gold.
Boss: Monstrous Interred Grizzle
- Monstrous Interred Grizzle does not need to be summoned and has a thirty minute respawn time. For more information, see the Peerless Page.
Prism of Light
The Prism of Light is located in Felucca on the isle of Nujel'm . It is a circular one way dungeon with teleporters to be used to gain further access in the dungeon.
| Monster | Quest Item |
|---|---|
| Glacial Water Elemental | Jar of Glacial Water |
| Ice Vortex | Frozen Soul |
| Crystal Hydra | Hydra Scale |
| Crystal Giant | Kristalen |
| Ice Wyrmling | Ring of Ice |
| Frozen Mummy | Icy Heart |
| Ice Wyrm | Ice Wyrm Spike |
| Shimmering Effusion | Prism of Light |
Boss: Shimmering Effusion
- In order to do battle with the Shimmering Effusion you must collect five crystals.
Prism of Light Walkthrough (Old)
The Collection Offered
Once you have gathered the required items, you will need to offer each dungeon's items up separately. To do this you must gather "Collector Boxes" for the area in which you wish to obtain the gem from.
Head to the Excelsior Halls which is on the World Telepad in the "Custom" Section. Walk east and into the building to the North. Find Aerial the Collector Maker. Map View
Here you must speak the name of the dungeon you wish to get the collector box for. (This must be the dungeon's full name)
Once you have the pieces ready and your collector box in your backpack, it is now time for you to add the items from the dungeon into the collector box.
Upon adding the final piece from the specific dungeon, you will be instantly transported to the designated area for each individual dungeon. Walk North to the npc and he will take your collector box and give you a gem from the area you completed.
You must now wait 72 hours before you can fill another dungeon's collector box.
Warning: The item collector must be in your pack when entering this special room. If you add the final item to the collector while it is on the ground, in your bank box, or somewhere else, you will be transported but unable to trade for the Gem. All items in the collector are destroyed once the last one is placed, and you will have to start over on this dungeon.
Six Gems for a Seventh
Once you have claimed the gems for all 6 dungeons, it is time to use your 7th collector, the Gem Collector. To get the Gem Collector you must revisit Aerial the Collector Maker and say "Gem Collector" Place the 6 gems within, and you will trade one final time for The Gem of Completion. Congratulations you have completed the Mage's Inquisition Quest.
The Joys of Completion
![]() Gem Of Completion
Gem Of Completion![]()
The Gem of Completion is a blue/orange bracelet; when double-clicked, allows you to pick one of the GoC items.

Rewards
| Name | Appearance | Preview |
|---|---|---|
| Cap of Knowledge (Cap): | |
View Item Stats |
| Gloves of the Seer (Gloves): | View Item Stats | |
| Shaman's Sleeves (Sleeves): | View Item Stats | |
| Apprentice's Stockings (Boots): | View Item Stats | |
| Legacy of the Archmagi (Male Chest): | View Item Stats | |
| Legacy of the Archmagi (Female Chest): | View Item Stats | |
| Arcanist's Protection (Shield): | View Item Stats |