The Mage's Inquisition Quest (GoC)
Edit: This page is being updated and combined with other pages. Please have patience as this process to re-write and update is not always fast.
The Mage's Inquisition Quest (GoC) is a great adventure with useful rewards. The rewards are so great that the quest itself must be completed with a lot of work, time, and in some instances, in groups.
This quest is split into 6 chapters, consisting of dungeons with creatures of various difficulties that yield key items needed for completion.
Contents
The Collection Awaits
This guide has been separated into sections for an easier understanding of each individual area.
Blighted Grove
Blighted Grove is considered the easiest of all the dungeons in the quest. It is the best place to start.
Blighted Quest Items
| |
|
|
|
| |
|
|
Blighted Quest Monsters
| Thrasher | Abscess | Insane Dryad | Drevo | ||||||
| Tangle | Saliva | Lady Melisande |
Blighted Grove Walkthrough (Old)
Sanctuary
This will be the second dungeon you will want to tackle in this adventure. The dungeon is filled with secret teleports to move around to different areas.
Sanctuary Quest Items
| |
|
|
| |
|
Sanctuary Quest Monsters
| Katchaki | Skrat the Imp Lord | The Cyclopian Warrior | ||||
| Netopir | Fire Ruby Dragon |
Labyrinth
Labyrinth is a long maze dungeon with hidden teleporters moving you to various areas and even backwards in this dungeon.
Labyrinth Quest Items
| |
|
| ||
| |
|
Labyrinth Quest Monsters
| Skorp Warrior | Slaarion | Egiptski Dragon | ||||
| Golden Liscar | Pyre |
Palace of Paroxysmus
The Palace of Paroxysmus is a long dungeon with a long poison river running through it.
Palace of Paroxysmus Quest Items
| |
|
|
| |
|
Palace of Paroxysmus Monsters
| Toxic Experiment | Chief Paroxysmus | Otrov the Widowmaker | ||||
| Putrid Waste | Izdajalska |
- In order to do battle with Chief Paroxysmus you must first gather 8 summoning items.
Palace of Paroxysmus Walkthrough (Old)
Bedlam
Bedlam is a smaller dungeon with areas holding the possibility of certain death.
Bedlam Quest Items
| |
|
|
| |
|
Bedlam Crypt Entrance
Bedlam Library Password
Bedlam Monsters
| Red Death | Lord Malachai | Monstrous Interred Grizzle | ||||
| Skeletor | Master Jonath |
Bedlam Mini Quest Monsters
| Ancient Mage Mikael | Master Theophilus |
Notable Monster
Prism of Light
The Prism of Light is located in fel. It is a circular one way dungeon with teleporters to be used to gain further access in the dungeon.
The Collection Offered
Once you have gathered the required items, you will need to offer each dungeon's items up separately. To do this you must gather "Collector Boxes" for the area in which you wish to obtain the gem from.
Head to the Excelsior Halls which is on the World Telepad in the "Custom" Section. Walk east and into the building to the North. Find Aerial the Collector Maker. Map View
Here you must speak the name of the dungeon you wish to get the collector box for. (This must be the dungeon's full name)
Once you have the pieces ready and your collector box in your backpack, it is now time for you to add the items from the dungeon into the collector box.
Upon adding the final piece from the specific dungeon, you will be instantly transported to the designated area for each individual dungeon. Walk North to the npc and he will take your collector box and give you a gem from the area you completed.
You must now wait 72 hours before you can fill another dungeon's collector box.
Warning: The item collector must be in your pack when entering this special room. If you add the final item to the collector while it is on the ground, in your bank box, or somewhere else, you will be transported but unable to trade for the Gem. All items in the collector are destroyed once the last one is placed, and you will have to start over on this dungeon.
Six Gems for a Seventh
Once you have claimed the gems for all 6 dungeons, it is time to use your 7th collector, the Gem Collector. To get the Gem Collector you must revisit Aerial the Collector Maker and say "Gem Collector" Place the 6 gems within, and you will trade one final time for The Gem of Completion. Congratulations you have completed the Mage's Inquisition Quest.
The Joys of Completion
![]() Gem Of Completion
Gem Of Completion
The Gem of Completion is a blue/orange bracelet when double-clicked, allows you to pick one of the GoC items.

Rewards
| |
|
|
|
| |
|
|
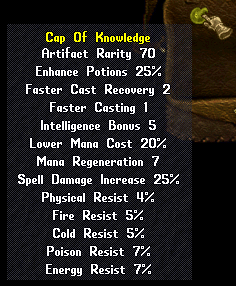
![]() Cap of Knowledge (Cap): Preview
Cap of Knowledge (Cap): Preview
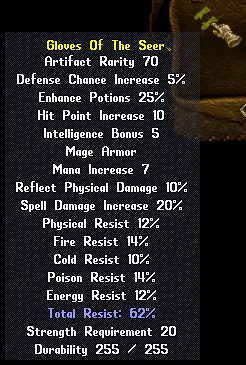
![]() Gloves of the Seer (Gloves): Preview
Gloves of the Seer (Gloves): Preview
![]() Shaman's Sleeves (Sleeves): Preview
Shaman's Sleeves (Sleeves): Preview
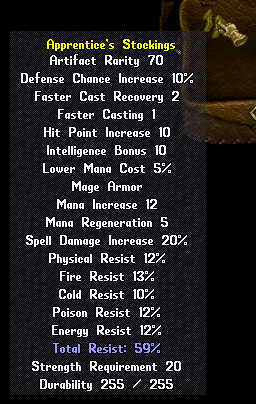
![]() Apprentice's Stockings (Boots): Preview
Apprentice's Stockings (Boots): Preview
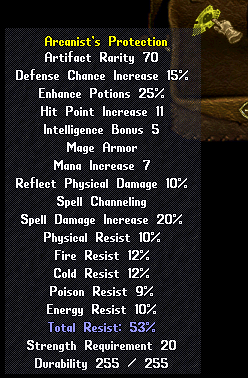
![]() Arcanist's Protection (Shield): Preview
Arcanist's Protection (Shield): Preview
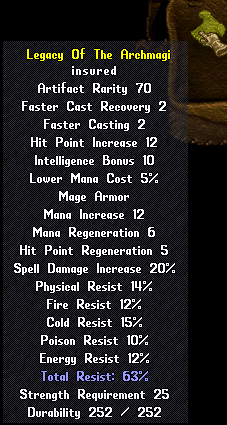
![]() Legacy of the Archmagi (Chest): Female Preview
Male Preview
Legacy of the Archmagi (Chest): Female Preview
Male Preview